Sunday, March 25, 2007
Shaking Rock
This is a REALLY great place to go climbing in the local area. There is enough boulder problems here that one could easily spend more then the day that we did. A lot of the rock and the problems are similar to it's cousins in Boat Rock a few hours to the west. Most of the boulders are located within the first walk up area, with a handful scattered out in the woods. The boulders out in the woods however have the marks of some dynamite handiwork.
Here is a short video clip of Tony at one of the very first boulders inside the gate of the park.
Friday, March 23, 2007
Picnic
I need all of the guides to send me in their RSVP's on whether or not they will be able to help support the games and festivities at the picnic this year. Supposedly the plan is for the 24th of May at the Softball field. Go figure, I guess the park isn't good enough for the likes of them.
Alright, this limits our options, probably have to rent the rock wall again this year and no kayaking. But we can play BALL!!! or.... tow the kayaks in a wicked race. What fun would that slip n' slide be. tee hee hee hee..... I personally will be photographing as the charlie oscar ends up at the end of the run in flipped kayak.
Anyways, please contact me asap!!! Oh yeah and happy climbing/hiking/camping and what have you.
PS. can every one let me know if they are interested in a Deliverance 2?
Sunday, March 18, 2007
Our big fat georgian woody!!
This last weekend with the help of Tom and Tony we put up a woody in the backyard.
The first problem came with how could we safely bolt the panel to the tree providing support, but also allowing us to remove it when we go to move. After much deliberation with the folks at Lowes we came up with the following Idea. We used lag bolts, drilled them into the tree attached to a starter board. Now I was worried about drilling into the trees that it might kill the trees.
We recently had to pay a company to come remove a very tall pine that had died in our backyard, and it created a great inconvenience. After talking to the plant people and the carpentry people we agreed that 2 lag bolts per tree, spaced more then 3 feet a part should not harm the tree.
We installed the lag bolts and starter boards and framed a 4x8 panel of 3/4 plywood. Then we attached the panel to the two starter boards using decking brackets on the backside of the panel. on the right side of the panel we attached the brackets to the outside of the 2x4 frame, but since the left side of the panel extended past the tree we put in an extra cross support and used this to attach to the starter board using the same decking brackets. We went ahead and installed the whole panel and starter boards roughly 2 feet from the ground.
The first panel was the hardest to set up and get in the right spot. At the same time we started framing the second panel, drilling the 6x6in grid for the holds in both panels and attaching the relevant hardware. Although I should have drilled holes in the first panel before I mounted it, I am glad I didn't, especially since we had to make a few minor adjustments with the starter board support on the back of the panel that would have interfered with a few of the bolt holes. At the same time we should have installed the T-nuts, but alas, hindsight is 20/20. While building the second panel we installed 2 eye bolts with locking nuts into the top corners of the panel, with the eye on the backside of the panel, and attached a non locking carabiner clip to the eye bolt.
We then installed 3 heavy duty door hinges on to the bottom side of the panel so that the pin was resting on the outside of the panel. We wanted it to eventually angle down when the top panel was opened up.
Approximatetly 4 feet up from the top of the bottom panel I drilled a hole in the side of both of the trees, attached an eye bolt, and looped the chain around the tree and used the eye bolt as a catch to prevent the chain from slipping down the tree. We secured the chain at it's tightest with a locking chain clasp/closure. we then used the chains and their supports, attached some tow straps, and hoisted the second panel into place. This is where it definitely was helpful to have two extra sets of hands. Due to the angle of the top panel we needed it to lay nearly flat so that I could access the hinges and screw them in to the bottom panel. This completed we attached the chains to the carabiners on the back of the panel.
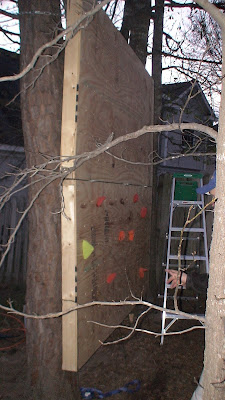
This completed, we started to install the holds. A long and tedious process, especially due to the fact that some of the holds used hex wrenches to tighten others used various other tools. Which we just happened to have hiding in Tom's Bike tool kit. It took almost 2 hours for us to install the holds, which we didn't put all 50 of them in. But come nightfall, we hung a lantern behind us and proceeded to test out our new woody!!
Here is a picture of the finished product! We purposely built it where we did because of the possibility of expanding it. There just happens to be a set of 3 trees in an L shape in this corner, two of which we used to build this section. The third is in the corner where the two fences meet, which happens to be blocked out by the woody.
At the same time, Tom also built a canted campus board and hung it off the deck so now we have a great training board that we can use whenever we feel like. This was also designed to be portable, and we can chuck it into the moving wagon when we go to move. If anyone would like some help designing or building their own woody feel free to contact me at mtthumper@gmail.com.
Thursday, March 15, 2007
Ring of Fire
Let me start out by saying in no way shape or form do I believe that I will accomplish the following feat in the next few years. It's something that I will hope will take a little bit of time and that I can tick off one by one.
My goal is to hike all of the major volcanoes in the Pacific Northwest, an endevour that I have named "The Ring of Fire". Which is of course only a small section of the true Ring of Fire. Anyways, I look at it like this, I have already been on Mt Shasta and Mt Baker, the two ends of the range and I guess I should start filling in the middle. Most of these mountains were literally in my backyard and they became landmarks or monuments of my life.
There are a handful of lesser peaks that at the moment I don't plan on putting on my list but one day I might decide to go ahead and do the easy hike up them. As for this summer, I am looking into hiking one of the following mountains..
Mt Adams
Glacier Peak,
Mt Jefferson or maybe one or another.
I have one hell of a training program set up right now, and if anyone wants to join me at the gym or on one of my outdoor workouts, you are always welcome, I could use the motivation :).
Alright, I will keep you all updated on the 'Mountain of Choice' and my progress. till later... CHEERS!!!
Monday, March 12, 2007
command picnic
The Navy command picnic is coming up and we have been asked again this year to help provide stuff for them. Do you have any ideas thoughts or suggestions? let us know... either post it as a comment here or shoot us an email at either oaforever@gmail.com or mtthumper@gmail.com.
We are hoping to push them into having it at North Augusta Park so that we can do some climbing, some hiking, some bigger games and bring the kayaks back out. Let me know if you support this!!!
Subscribe to:
Posts (Atom)